How Can You Do a Fast Car Paint Correction in Just 30 Minutes?
You have limited time, but you want your car to seem significantly improved. This 30-minute car paint-correction guide is aimed at the high-impact operations that eliminate light swirls, water spots and haze without excessive compounding. Specify on the most exposed parts (hood, roof, driver door), apply finishing materials and work in a strict order, which will be: wash, decontaminate, prep, polish, wipe, and protect. Do the work in shadow, have the tools on hand and do the work as well as you can.
Step 1: Prep & Light Wash
Goal: remove loose dirt so you won’t grind contamination into the paint while polishing.
How to do it fast:
- Use a microfiber wash mitt and either put on the rinseless wash (Optimum No Rinse is best) or rinse.
- Wash and rinse with grit guards. Two buckets should be used in case you have them. If not, rinse the mitt often.
- Only pay attention to the polishing panels. eliminates bird droppings, tar, or heavy dirt with a spot cleaner.
- Blot on a paper towel within a minute or apply an air blower to the creases.
Pro tip: Working on just one or two panels lets you spend more polishing time where it shows.
Step 2: Decontaminate Trouble Spots
Goal: eliminate embedded dirt, which produces micro-scratches in the course of polishing.
Fast options:
- Run your hand over the panel. In case rough, apply alternative spray or quick pass clay bar only on rough parts.
- Or remove brake dust, and embedded and embedded particles with an iron remover spray, wait, rinse or towel off.
It should not be too many strokes on this step, only till one makes the surface smooth to touch.
Step 3: Panel Prep
Goal: clean the surface chemically to ensure that the polish works properly.
What to do:
- Wipe each panel you’ll correct with an IPA mix (10–20% isopropyl alcohol in water) or a dedicated panel prep spray.
- This removes oils and waxes and reveals the true level of defects so you don’t over-polish.
Optional: tape off the rubber trim and rubber seals if polishing near edges.
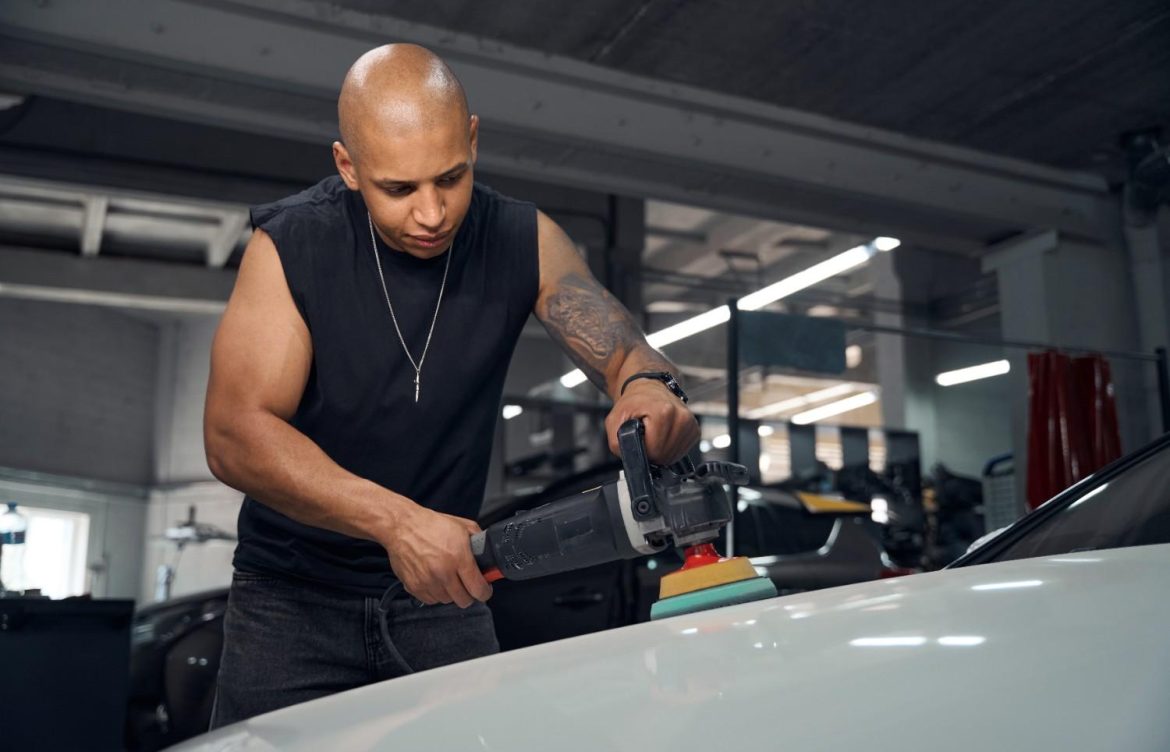
Step 4: Fast Polish / Light Correction
Goal: remove light swirls and haze with minimal passes.
If you have a DA polisher:
- Use a soft finishing pad and a fine polish (Meguiar’s M205, Sonax Perfect Finish, Chemical Guys V36).
- Work in 2×2 ft sections: 3–4 passes at moderate speed, light pressure. Stop and inspect.
If hand-polishing:
- Use a microfiber or foam applicator with small amounts of finishing polish; apply evenly and buff off immediately with a clean towel.
Key rules:
- Begin with the simplest action that will complete the task and amend it first, sometimes polishing before compounds.
- Edges or corners should not be overworked. When a place is not cleared in a short trip, reserve it for a longer lesson in the future.
Time management: you will see the panels that are most visible to you – concentrate on those, and you will have the most visual improvement.

Step 5: Remove Residue & Inspect
Goal: reveal the result and correct any holograms or remaining swirls.
How:
- Wipe polished areas with a fresh microfiber towel.
- Use an angled light (phone flashlight) to inspect. Avoid working out whole sheets of paper, but focus on small spots.
When everything appears to be fine, proceed to protection so as to freeze the gloss.
Step 6: Apply Quick Protection
Goal: add gloss and hydrophobic protection that lasts weeks to months.
Fast choices:
- Spray sealant (Klasse High Gloss Sealant) or a polymer quick detailer (Griot’s Speed Shine, Meguiar’s Quick Detailer).
- Spray one panel at a time and buff with a plush microfiber. One light coat is enough for a quick session.
Why this matters: protection helps the finish stay clean and prevents water spots; it also enhances the polished appearance.
FAQs
1: Will a 30‑minute correction damage my paint if I use a DA polisher?
No, a short, controlled session will not damage paint when you follow safe practices. A dual-action polisher (as opposed to a rotary) should be used, a soft finishing pad should be selected, and a fine polish should be used over a heavy compound. Middle machine speed and light pressure. covered with tape, taping and examining frequently. When you are not sure how to do it, apply a finishing polish by hand; it is a safe way, but still increases the gloss and minimizes light swirls.
2: What is the frequency at which I can carry out this brief 30-minute paint fix?
A light finishing polish and spray-seal can safely be applied after every 4-8 weeks with regard to exposure, laundry rates and environment. Do not do abrasive polishing so often, but only when necessary (several times a year or once a year). Regular maintenance washes and quick detailers should be used between sessions so as to maintain the finish and less frequently, you will be required to polish.
Quick Shine, Big Impact
This dedicated 30-minute practice will provide you with noticeable results without the need to dedicate a day to it: eliminate the presence of contamination on the surface, fix light defects, and apply a finish. Emphasize visible panels, finishing products and checking regularly. The outcome: a fresher, slicker car that is easier to take pictures of and one that makes people stare in a short period of time.